It's 2020, and the testing frameworks for JavaScript applications have improved dramatically over the past few years.
Thanks to tools like Jest and React Testing Library, you can be testing your apps with a few lines of code.
Have you been looking into testing an Ionic React project, but not sure where to start? In this post, I'll go over the basics of how to get started as we build out an app using tests.
The Tools
First, let us go over a few of the tools that we will be using.
Jest is a testing framework built by the teams at Facebook (like React) and is very similar to other test frameworks like Jasmine and Mocha. Jest has been the defacto standard in React testing for quite awhile and is gaining popularity in other communities as well. What makes Jest great is it is easy to use, is flexible in the types of tests you want to create, and has a powerful test runner that is smart about running only tests for code that has changed.
Jest is already included and set up when you create a new Ionic React project, so getting started is super easy.
React Testing Library (RTL from here on out) is a relative newcomer to the React landscape, but it is also grown immensely in popularity. RTL lets you test React components without relying on the internal implementation details of the component. This approach mimics more of the way an actual user would use the app and promises to make tests more reliable and less brittle to change.
React Testing Library is now included when creating a new Ionic App and is our recommended test library.
The Ionic React Test Utils is a small suite of utilities that can help when testing Ionic React apps. It includes helpers to fire off custom Ionic events and mocks around some of our more complex components.
Getting Started
Our demo will keep a list of things we need to get done (don't call it a todo app!). Okay, it's a todo app, but a todo app is basic enough yet covers a few of the points I want to hit on testing Ionic components.
Start off creating a New Ionic React project via the Ionic CLI:
ionic start ionic-react-todos blank --type=react
If you are new to Ionic and need to get things set up, view our getting started guide here.
This command kicks off a new Ionic React project named "react-todos" using the blank template.
Next, we need to install Ionic React Test Utils, which we will use a bit later on. Go into the new directory and install the npm package:
cd ionic-react-todos
npm i @ionic/react-test-utils
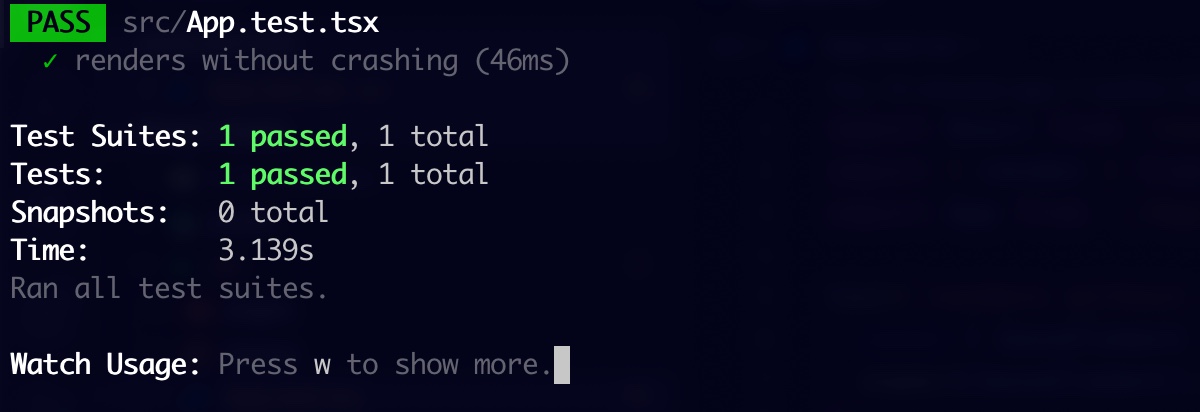
Open up the project in your code editor. If you look in the
src
folder, you might notice that we already have a test file created for us in
App.test.tsx
. It is a simple test that just makes sure the main app component renders correctly without throwing an error.
it('renders without crashing', () => {
  const div = document.createElement('div');
  ReactDOM.render(<App />, div);
  ReactDOM.unmountComponentAtNode(div);
});
Go back into your command line, and fire up the Jest test runner:
npm run test
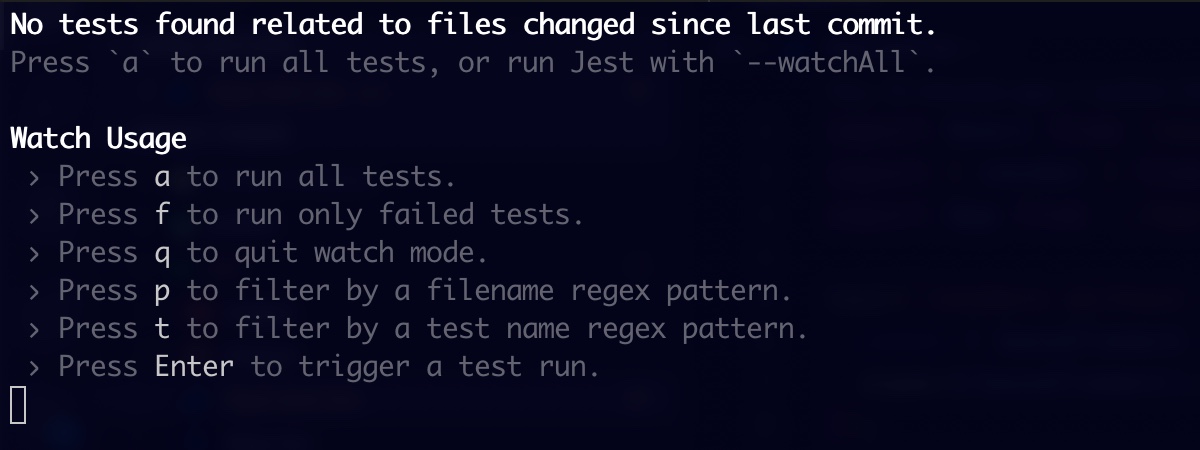
You might get a message saying there were no tests found, which is because Jest (by default) only runs tests on files that are modified since the last git commit. This is pretty handy and helps speed up testing by only running tests on files you are currently working on. Fortunately, we can see on the menu that we can change the "Watch Usage". Press "a" to run all tests.
Go ahead and leave Jest running. If we make any changes to our code, Jest automatically reruns the tests.
Your First Test
Okay, back in the code, let's create a test at
src/pages/Home.test.tsx
. We will create a basic test that makes sure the title of our page is "Ionic React Todos". Paste the following code into the test:
import React from 'react';
import { render } from '@testing-library/react';
import Home from './Home';

test('page should have a title of Ionic React Todos', async () => {
  const { findByText } = render(<Home />);
  await findByText('Ionic React Todos');
});
Let's break down the basic anatomy of a test. First, we have our imports, including the
render
method from RTL and then our
Home
component. Then we have our actual test. The
test
method is from Jest and is available globally, so there is no need to import it. For its first parameter, it takes in the name of the test, in which we usually provide some detailed text about what we are trying to accomplish, and then an anonymous function that contains the code for the test.
The
render
method takes our component and returns a bunch of helper methods to aid us in selecting pieces of the DOM that was rendered. The
findByText
method is one of them, and it looks for an element that contains the text passed into it. If it doesn't find one (or finds more than one),
findByText
throws an error. Therefore, there is no need for us to test the return value of
findByText
in this case.
For a list of all the helper methods
render
returns, check out the RTL docs here.
If you view Jest again you will see that the test failed:
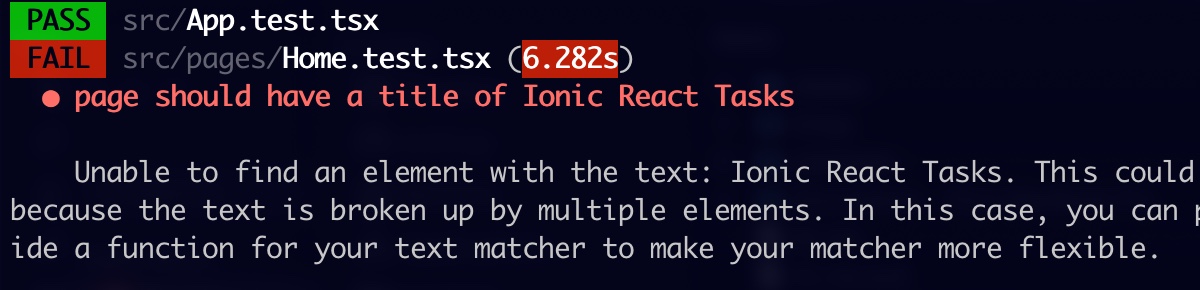
We get a descriptive output about what happened and where. But basically, our text "Ionic React Todos" wasn't found. Update the
<IonTitle>
text in the Home component and come back, the tests should now pass:
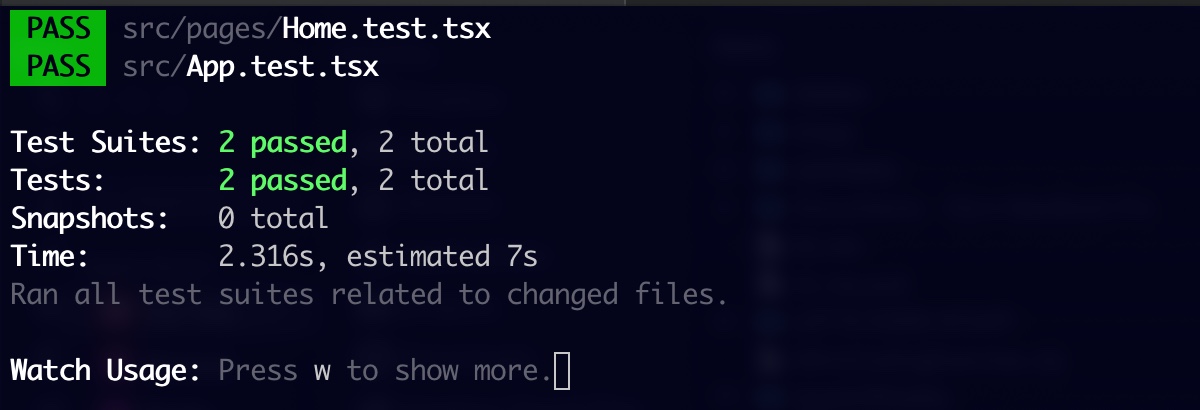
Now that's what we like to see!
Building the Todo List
We have our first test passing, so that means it is time to write another failing one! When we have no todos to display, we want a message that says there are none. Here is the test for that:
test('when there are no todos, a no todos message should show', async () => {
  const { findByText } = render(<Home />);
  await findByText('No todos, add some!')
});
Take a look at the Jest runner, and you should see the new test failing. Let's update the component to display the message when there are no todos.
To get started, add a
Todo
interface to the top of
Home
and create a state variable using the
useState
hook to hold the todos. Also, update the
<IonContent>
to display a message if there are no todos.
Update
Home
to:
export interface Todo {
  id: number;
  text: string;
}

const Home: React.FC = () => {
  const [todos, setTodos] = useState<Todo[]>([]);
  return (
    <IonPage>
      <IonHeader>
        <IonToolbar>
          <IonTitle>Ionic React Todos</IonTitle>
        </IonToolbar>
      </IonHeader>
      <IonContent className="ion-padding">
        {todos.length === 0 ? (
          <div>No todos, add some!</div>
        ) : (
            <div>todos will go here</div>
          )}
      </IonContent>
    </IonPage>
  );
};
Our last test should now be passing. Let us write another to make sure our todos appear when there are some:
test('when TodoList is loaded with todos, then the todos should be in the list', async () => {
  const todos: Todo[] = [
    { id: 1, text: 'review PR' },
    { id: 2, text: 'update docs' }
  ];
  const { findByText } = render(<Home />);
  await findByText(todos[0].text);
  await findByText(todos[1].text);
});
We are running a couple of
findByText
calls here to make sure both the todos are added. If either of these fails to find an element, then an error is thrown.
Next, replace the
<div>todos will go here</div>
placeholder with this snippet which creates an
IonList
with an
IonItem
for each of the todos:
<IonList>
  {todos.map((todo, i) => (
    <IonItem key={i}>
      <IonLabel>
        <h2>{todo.text}</h2>
      </IonLabel>
      <IonIcon data-icon="trash" icon={trash} color="danger" slot="end" />
    </IonItem>
  ))}
</IonList>
All the Ionic components are imported from
@ionic/react, and thetrashicon is imported fromionicons/icons.
But wait, how's our
Home
component getting the array of Todos? Right now, it's not. Let's pretend the
Home
component calls into an API to fetch the todos. We won't have a real API, but we will create and load a json file with some data. Create a file at
public/assets/todos.json
and paste the following into it:
[
  {
    "id": 1, "text": "review PR"
  },
  {
    "id": 2, "text": "update readme"
  },
  {
    "id": 3, "text": "write docs"
  }
]
Back in
Home
, add a
useEffect
hook to call into the API and set the todos state:
useEffect(() => {
  async function doFetch() {
    const result = await fetch('/assets/todos.json');
    const data = await result.json();
    setTodos(data);
  }
  doFetch();
}, []);
Mocking an HTTP Request
Our tests start to fail because the fetch call won't be able to make the request while running in Jest. Fortunately, Jest allows us to mock fetch and return specific data. Add the following
mockFetch
method to the test file, which allows us to pass in some data that returns from the
fetch
call, as well as the
beforeEach
Jest helper, which calls the mock function before each test runs:
function mockFetch(data: any) {
  return jest.spyOn(window, 'fetch').mockResolvedValue(new Response(JSON.stringify(data)));
}

beforeEach(() => mockFetch([]));
In the last test, we can call
mockFetch
and pass in our todo array:
// todos array
mockFetch(todos);
// render and fetchByText methods
When the component calls
fetch
, it now returns the mock test data we have set up for it, and our test passes.
Adding a Todo
Next up is the bulk of our functionality, adding a todo to the list!
The next test does quite a bit. We will test clicking an add todo button, verifying the todo from loads, filling out the form, submitting the form, and lastly, making sure the todo appears in the list. This might seem like a lot, but RTL promotes testing a page, much like how a user would interact with it. This lets us cover quite a bit of functionality in a single test.
Go ahead and start to stub out the test with our first step: clicking a button to display the new todo form:
test('when clicking the new button, we should be able to add a new todo', async () => {
  const { findByTitle, findByText } = render(<Home />);
  const addButton = await findByTitle('Add Todo');
  fireEvent.click(addButton);
});
fireEvent
is imported from
@testing-library/react
and helps us simulate user interaction with the DOM elements that get returned. Here we are using it to click the
addButton
.
We are also using a new function returned from
render
here,
findByTitle
, which works very similarly to
findByText
, but instead looks for an element for a certain title. Update the
Home
component and add the following right above the closing
</IonContent>
tag:
<IonFab vertical="bottom" horizontal="end">
  <IonFabButton title="Add Todo" onClick={() => setShowModal(true)}>
    <IonIcon data-icon="add" icon={add} />
  </IonFabButton>
</IonFab>
<IonModal
  onDidDismiss={() => setShowModal(false)}
  isOpen={showModal}
>
  {/* Todo Form will go here */}
</IonModal>
Also add the state variable (right below the todos state) to maintain if we are displaying the modal containing the todo form:
const [showModal, setShowModal] = useState(false);
Buh uh oh, the tests have started to fail due to a new error:
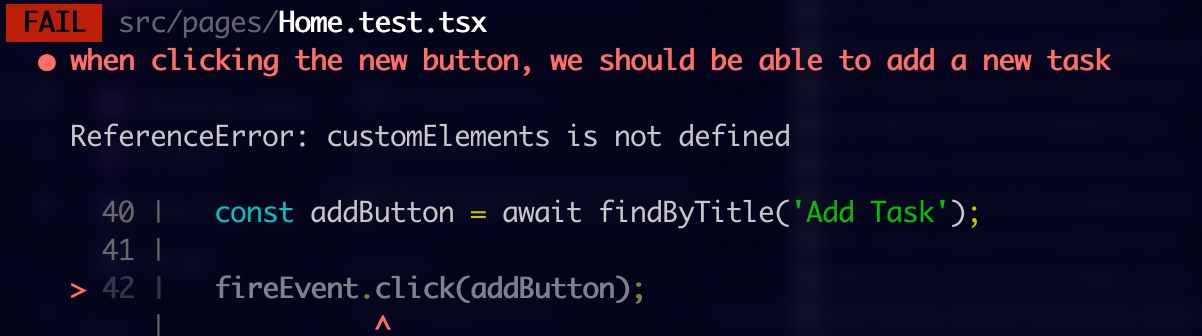
This error leads us up to a bit of a tricky spot when it comes to testing Ionic React.
Using Ionic React Test Utils to mock Ionic Web Components
Note: Right before this blog was published, the JSDOM team announced customElement support for JSDOM. We are excited for this and will monitor if it fixes the issues we ran into and will update the post accordingly.
Ionic is written in web components, and Ionic React is a thin layer around those components to make them feel and behave more like the React components. Unfortunately, JSDOM does not currently support web components and errors if trying to access web component API, like
customElements
in the error above.
What we can do here, though, is use Jest to mock out the Ionic React components that can't render (like IonModal), which is where Ionic React Test Utils (IRTU) comes into play. IRTU provides a helper that can mock out all known Ionic components that have issues rendering in JSDOM. The mocked components simulate the actual ones by rendering minimal DOM to test.
To set it up, go into
src/setupTests.ts
file and update it with:
import { mockIonicReact } from '@ionic/react-test-utils';
mockIonicReact();
That should get the test passing.
For more info around this method, read Testing Web Components in React on Dev.to.
Testing the Form
Ok, let's continue flushing this test out. Now that the modal is loading, we will get the input box and save button:
const input = await findByTitle('Todo Text');
const button = await findByText('Save');
Time to implement the functionality for the form. Add the following form to the
IonModal
in
Home
, replacing
{/* Todo Form will go here */}
:
<IonToolbar>
  <IonTitle>Add Todo</IonTitle>
</IonToolbar>
<IonContent>
  <IonList>
    <IonItem>
      <IonLabel position="stacked">Todo</IonLabel>
      <IonInput id="todo" title="Todo Text" value={text} onIonChange={e => setText(e.detail.value!)} />
    </IonItem>
  </IonList>
  <IonButton expand="block" onClick={addTodo}>
    Save
  </IonButton>
</IonContent>
And add the new text/setText state variables as well as the method to save the todos to the top of the function:
const [text, setText] = useState('');

const addTodo = () => {
  const nextId = todos.reduce((id, todo) => Math.max(id, todo.id!), 0) + 1;
  const todo: Todo = {
    id: nextId,
    text
  };
  setTodos([...todos, todo]);
  setShowModal(false);
  setText('');
};
Next, we need to simulate filling out the form and clicking the save button. Typically, you would use the
fireEvent.change
method from RTU to simulate an input change. This fires the input element's
change
event. However, Ionic components fire custom 'ion' events like 'ionChange'. Therefore, we can't use
fireEvent.change
here.
To help with this, IRTU exports
ionFireEvent
, which wraps RTU's
fireEvent
, and augments it with all the custom Ionic events. Therefore, you can use
ionFireEvent
as a drop in replacement for
fireEvent
. To do so, import
ionFireEvent
and alias it to
fireEvent
:
import { ionFireEvent as fireEvent } from '@ionic/react-test-utils';
And remove the
fireEvent
import from
@testing-library/react
.
Now, we fire the
ionChange
event and click the button and verify that our todo gets added to the list:
fireEvent.ionChange(input, 'test todo');
fireEvent.click(button);
await findByText('test todo');
How did we do?
So far, we have written quite a bit of functionality driven entirely by tests. If we fire up the dev server:
ionic serve
We should see the list of todos get loaded from the fetch request, and be able to create a new todo.
You might notice there are delete icons for each of the todos. I'll leave that as an exercise for you to implement the delete functionality.
I've included a link to the full demo repository below that expands on the app a bit more, including deleting todos.
Wrapping up
It might have taken a bit of extra time to drive this development through tests, but now we have a good set of tests to run anytime we make updates to the app that gives us confidence that we didn't break anything.
Here is a list of resources for more info about the content covered in this post:
- React Testing Library
- Jest
- Ionic React Test Utils
- Kent C Dodd's Blog (author of React Testing Library and great articles on testing)
- Github repo for the demo app
Interested in learning more about testing Ionic React apps? Let us know down below with your questions or comments.
Until next time, may your tests be green and your todos list complete!
Happy coding.